Incidents
The Incidents page is where your team creates and manages unplanned service issues.
Use This Page For
- Create a new incident when something is degraded or unavailable.
- Post updates as the situation changes.
- Resolve incidents when the service is healthy again.
Create An Incident
- Open Incidents from the page admin sidebar.
- Select Create Incident.
- Enter a short, customer-facing title. Use wording your subscribers will recognize, such as "Elevated API error rates" rather than an internal ticket name.
- Choose the current impact or status for the incident.
- Select the affected services or components so the public page shows the right impact.
- Write the first update. Say what is affected, what users may experience, and what your team is doing next.
- Review the start time. Use the real start time if the issue began before you opened the incident.
- Create the incident. StatiBeat adds it to the incident timeline and updates the affected public status areas.
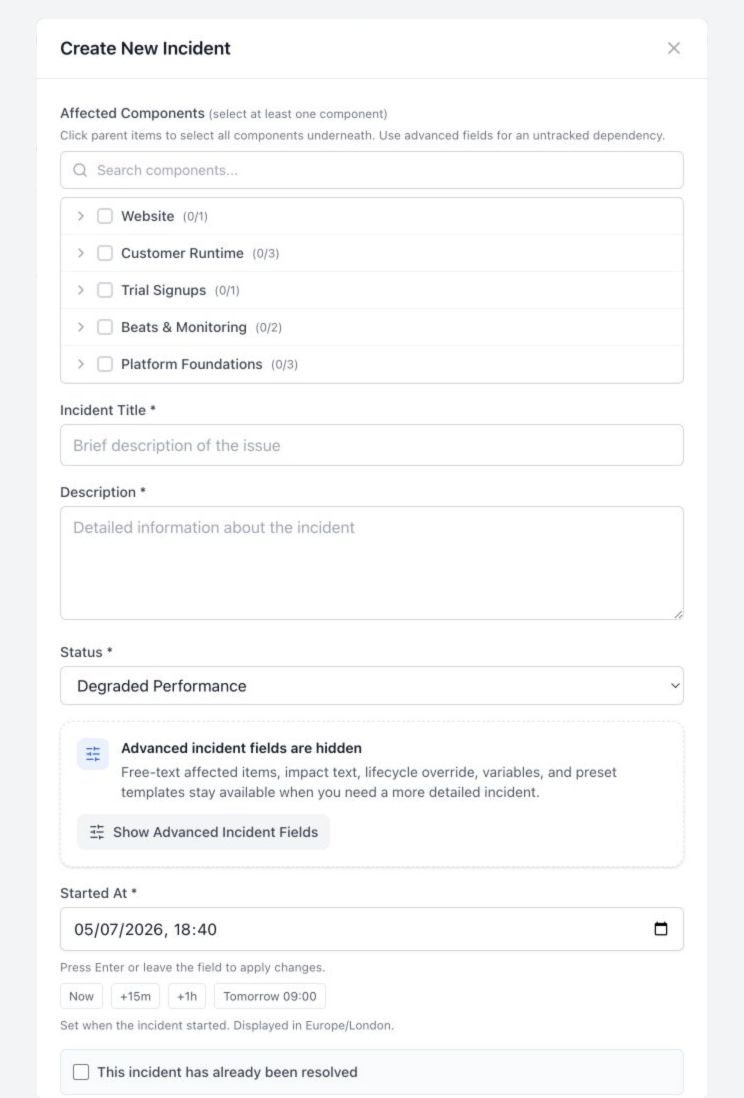
1Affected ComponentsControls which services, systems, or hierarchy items show impact on the public page.
1Affected ComponentsControls which services, systems, or hierarchy items show impact on the public page.
Incident Modal Fields
- Affected Components controls which services, systems, or hierarchy items show impact on the public page.
- Incident Title is the short customer-facing name shown in lists, notifications, and incident detail views.
- Description is the opening summary. Use it to explain what users may experience and what your team is doing first.
- Status sets the current incident impact, such as degraded performance or outage.
- Advanced Fields reveals free-text affected items, impact text, lifecycle overrides, variables, preset templates, and previews.
- Started At should be the real time the issue began, not just the time you opened the modal.
Advanced Options
- Show advanced incident fields when the standard form does not capture enough detail.
- Use free-text affected items for untracked services, third-party dependencies, or customer-facing impact that does not map cleanly to a hierarchy item.
- Add impact text when the title and first update need a separate customer-facing explanation of what users may experience.
- Override the lifecycle stage when the incident should start in a non-default stage, or when an update needs to record a specific stage change.
- Use preset templates, variables, and previews when you need consistent wording across the title, description, or impact text.
- For incidents that have already been resolved, select the historical incident option, set the acknowledged and resolved times, and add timeline updates with the time, status, lifecycle stage, and message for each important event.
After Creation
- Use Update to publish follow-up messages as you learn more.
- Keep affected items current if the impact expands or narrows.
- Use preset messages when you need consistent wording across incidents.
- Use Resolve when the service is healthy again, and include a clear final update.
- Reopen a resolved incident only when the same issue returns and your page policy allows reopening.